GST Registration process in GST portal Step by Step
Who can apply for GST Registration
Who should register for GST?
All the businesses supplying goods whose turnover exceeds INR 40 lakh in a financial year are required to register as a normal taxable person. However, the threshold limit is INR 10 lakh if you have a business in the north-eastern states, J&K, Himachal Pradesh, and Uttarakhand.
The turnover limit is INR 20 lakh, and in the case of special category states, INR 10 lakh, for the service providers.
Also, here is the list of certain businesses for which GST registration is mandatory irrespective of their turnover:
- Casual taxable person / Input Service Distributor (ISD)
- Non-resident taxable person
Inter-state supplier of goods and services - Supplier of goods through an e-commerce portal
- Any service provider
Liable to pay tax under the reverse charge mechanism - TDS/TCS deductor
- Online data access or retrieval service provider.
- Any business voluntary can apply for GST with any turnover but not mandatory.
List Of Documents Required For GST Registration
Documents in case of required for Sole Proprietorship / Individual
- PAN card of the individual
- Aadhaar Card,
- Passport size photo of the sole proprietor.
- Registered Office Address proof:-
–Self-owned property – Copy of electricity bill, landline bill, water bill, municipal khata copy, property tax receipt - –Rented property – Rent agreement and No objection certificate (NOC) from the owner of the rented property.
- Bank account details- a copy of the cancelled cheque, the front page of passbook or bank statement
Documents required for Partnership deed/LLP Agreement
- Documents of Partners:- PAN Card, Passport size photograph and Address Proof of Partners,
- Partnership Deed,
PAN card of Firm,
Registered Office Address proof:-
–Self-owned property – Copy of electricity bill, landline bill, water bill, municipal khata copy, property tax receipt - –Rented property – Rent agreement and No objection certificate (NOC) from the owner of the rented property.
- Bank account details- a copy of the cancelled cheque, the front page of passbook or bank statement
- Additional documents in case of LLP– Copy of Board Resolution, Registration Certificate of the LLP
- Proof of appointment of authorized signatory (Digital Signature Certificate of any one of the designated partner)
Documents required for Private Limited / Public Limited / One Person Company (Indian or Foreign)
PAN Card of the company
- Registration Certificate of the Company (Certification of incorporation) given by MCA
Memorandum of Association (MOA) /Articles of Association (AOA) - PAN card, Passport size Photograph and Aadhaar card of all Directors,
PAN card and Aadhaar card of the authorized signatory. - Board Resolution or any other proof of appointing authorized signatory
- Registered Office Address proof:-
–Self-owned property – Copy of electricity bill, landline bill, water bill, municipal khata copy, property tax receipt - –Rented property – Rent agreement and No objection certificate (NOC) from the owner of the rented property.
Bank account details- a copy of the cancelled cheque, the front page of passbook or bank statement
Documents required for HUF
- PAN card of HUF
- PAN Card and Aadhaar card of Karta
- Passport size Photograph of Owner
- Registered Office Address proof:-
–Self-owned property – Copy of electricity bill, landline bill, water bill, municipal khata copy, property tax receipt - –Rented property – Rent agreement and No objection certificate (NOC) from the owner of the rented property.
- Bank account details- a copy of the cancelled cheque, the front page of passbook or bank statement
Documents required for Society or Trust or Club
Pan Card of society/Trust/Club
Registration Certificate of society or club
- Passport size Photograph and PAN Card of Promoter/ Partners
- PAN card and Aadhaar card of the authorized signatory.
- Board Resolution or any other proof of appointing authorized signatory
Registered Office - Address proof:-
–Self-owned property – Copy of electricity bill, landline bill, water bill, municipal khata copy, property tax receipt
–Rented property – Rent agreement and No objection certificate (NOC) from the owner of the rented property. - Bank account details- a copy of the cancelled cheque, the front page of passbook or bank statement
GST Registration process Step by Step
GST portal and fill the registration Form GST REG-01.
Visit GST portal
Click on ‘Registration’ under the ‘Services’ tab and then click on ‘New registration’

The application form is divided into 2 parts – Part A and Part B.
- Select the ‘Taxpayer’ as the type of taxpayer from the ‘I am a’ drop-down list
- From the State/UT and District drop-down list, select the state and district for which registration is required
- In the Legal Name of the Business field, enter the legal name of the business/ entity as mentioned in the PAN database
In the Permanent Account Number (PAN) field, enter PAN of the business or PAN of the Proprietor

OTP Verification
OTP Verification & TRN Generation
- when you submission of the above information, the OTP Verification page is displayed . OTP will be valid only for 10 minutes. Therefore, enter the two separate OTP sent to validate the email and mobile number.
- Enter your Mobile OTP in Mobile field.
- Enter your OTP in the email field .
TRN Generated
Now after successfully completing OTP verification, a TRN will be generated. TRN will now be used to complete and submit the GST registration application.

Log in with TRN
Upon receiving TRN, the applicant shall begin the GST registration procedure. In the Temporary Reference Number (TRN) field on the GST Portal, enter the TRN generated and enter the captcha text as shown on the screen. Complete the OTP verification on mobile and email.

Now click on the red icon to start GST registration
Enter the business information
Some information must be submitted for obtaining GST registration in GST Portal.
In the first tab, business details must be submitted.
- In the Trade Name field, enter the trade name of the business should be mentioned.
- Input the Constitution of the Business from the drop-down list.
- Enter the District and Sector/ Circle / Ward / Charge/ Unit from the drop-down list.
- In the Commissioner ate Code, Division Code and Range Code drop-down list, select the appropriate choice.
- Opt for the Composition Scheme, if necessary
Input the date of commencement of business. - Select the Date on which liability to register arises. This is the day the business crossed the aggregate turnover threshold for GST registration.
- It is mandatory that Taxpayers are required to file the application for new GST registration within 30 days from the date on which the liability to register arises.
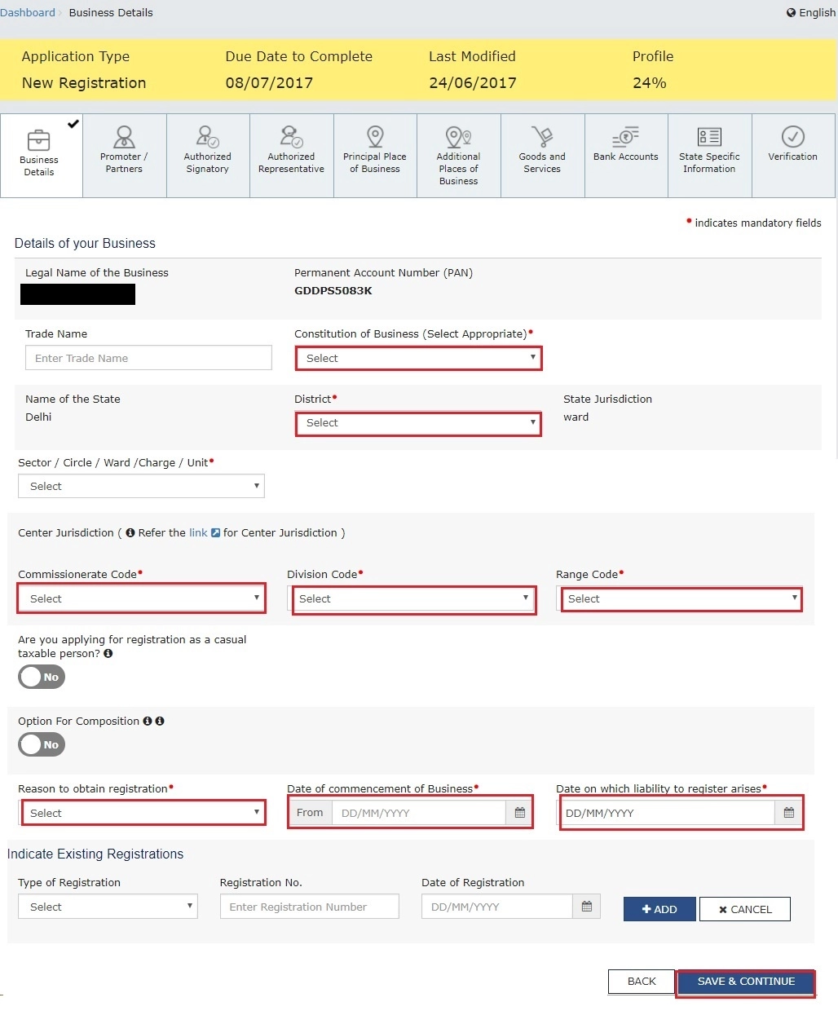
Submit Information to be filled in case of proprietor or Company
- In the next tab,
- Provide promoters and directors information.
- Details of up to 10 Promoters or Partners can be submitted in a GST registration application.
- In case of proprietorship, the proprietors’ information must be submitted.
The following details must be submitted for the promoters:
- Personal details of the stakeholder like name, date of birth, address, mobile number, email address and gender.
- Designation of the promoter.
- DIN of the Promoter, only for the following types of applicants:
- Private Limited Company
- Public Limited Company
- Public Sector Undertaking
Unlimited Company - Foreign Company registered in India
- Details of citizenship
PAN & Aadhaar
Residential address - In case the applicant provides Aadhaar, the applicant can use Aadhaar e-sign for filing GST returns instead of a digital signature.
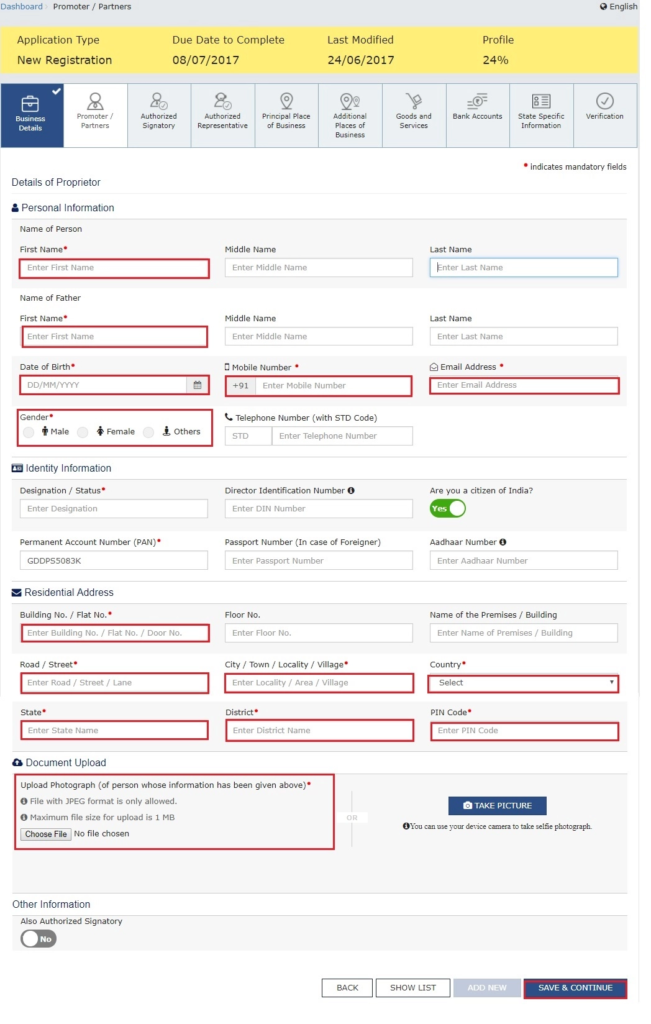
Submit Authorized Signatory Information
A company nominate a person, an authorized signatory. He is a promoter of the company. It is responsibility of the nominated e
person to hold the responsibility for filing of GST Returns. The promoter is also to maintain the necessary compliance of the company. The authorized signatory will have full access to the GST Portal. The person shall undertake a wide range of transactions on behalf of the promoters.
Principal Place of Business information
After completion of promoter detail now in this section
the applicant shall provide the details of the principal place of business.
The primary location within state where the taxpayer operates the business is the principal place of business.
This is the addresses the books of accounts and records are kept.
Whereas, the registered office the principal place of business in the case of a company or LLP.
For the principal place of business enter the following:
Address of the principal place of business.
Official contact such as Email address, telephone number (with STD Code), mobile number field and fax number (with STD Code).
Nature of possession of the premises.
If the principal place of business located in SEZ or the applicant acts as SEZ developer, necessary documents/certificates issued by Government of India are required to be uploaded by choosing ‘Others’ value in Nature of possession of premises drop-down and upload the document.
In this section, upload documents to provide proof of ownership or occupancy of the property as follows:
Own premises – Any document in support of the ownership of the premises like Latest Property Tax Receipt or Municipal Khata copy or copy of Electricity Bill.
Rented or Leased premises – A copy of the valid Rent / Lease Agreement with any document in support of the ownership of the premises of the Lessor like Latest Property Tax Receipt or Municipal Khata copy or copy of Electricity Bill.
Premises not covered above – A copy of the Consent Letter with any document in support of the ownership of the premises of the Consenter like Municipal Khata copy or Electricity Bill copy. For shared properties also, the same documents may be uploaded.
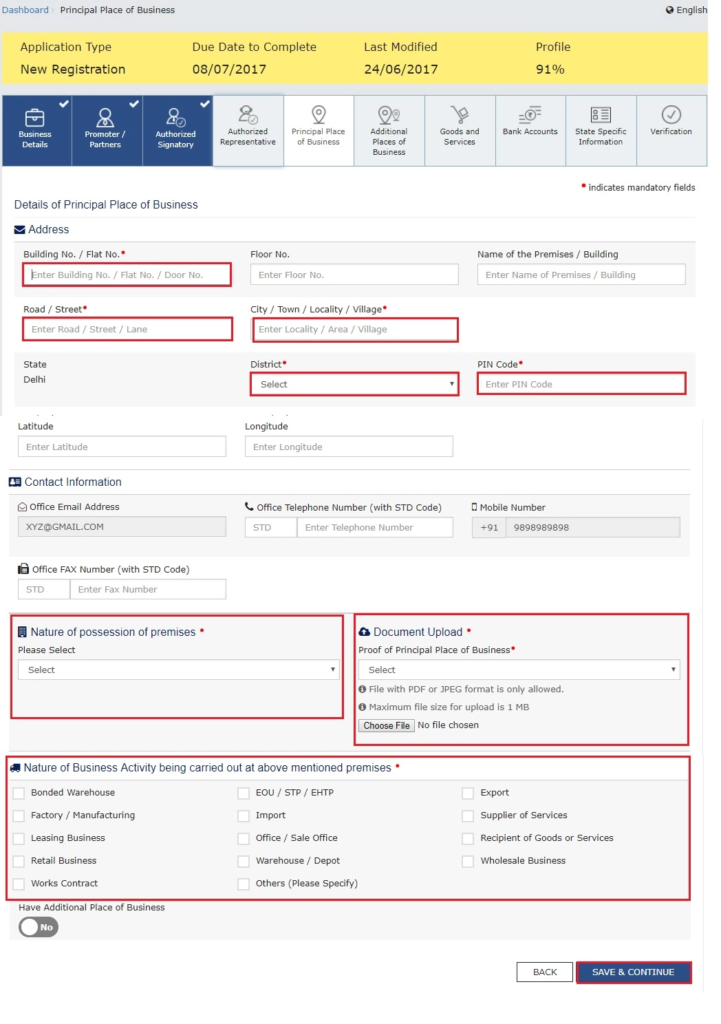
Additional Place of Business
In additional place of business, enter details of the property in this tab. For example,
if the applicant is a seller on Amazon or other e-commerce portal and uses the seller’s warehouse, that location can be added as an additional place of business.
Details of Goods and Services
In this section, the taxpayer must provide details of the top 5 goods and services supplied by the applicant. For goods supplied, provide the HSN code and for services, provide SAC code.
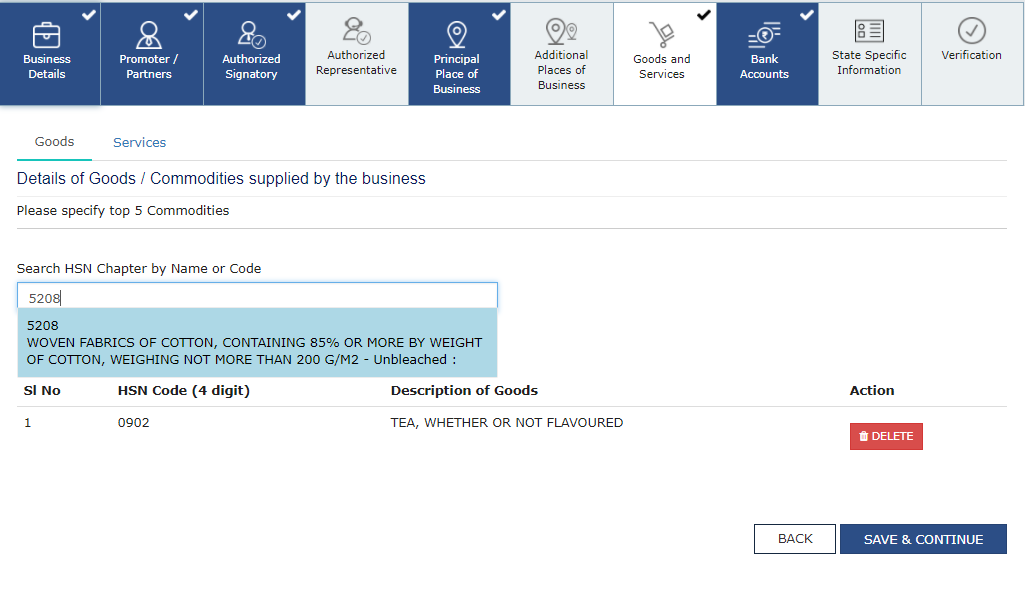
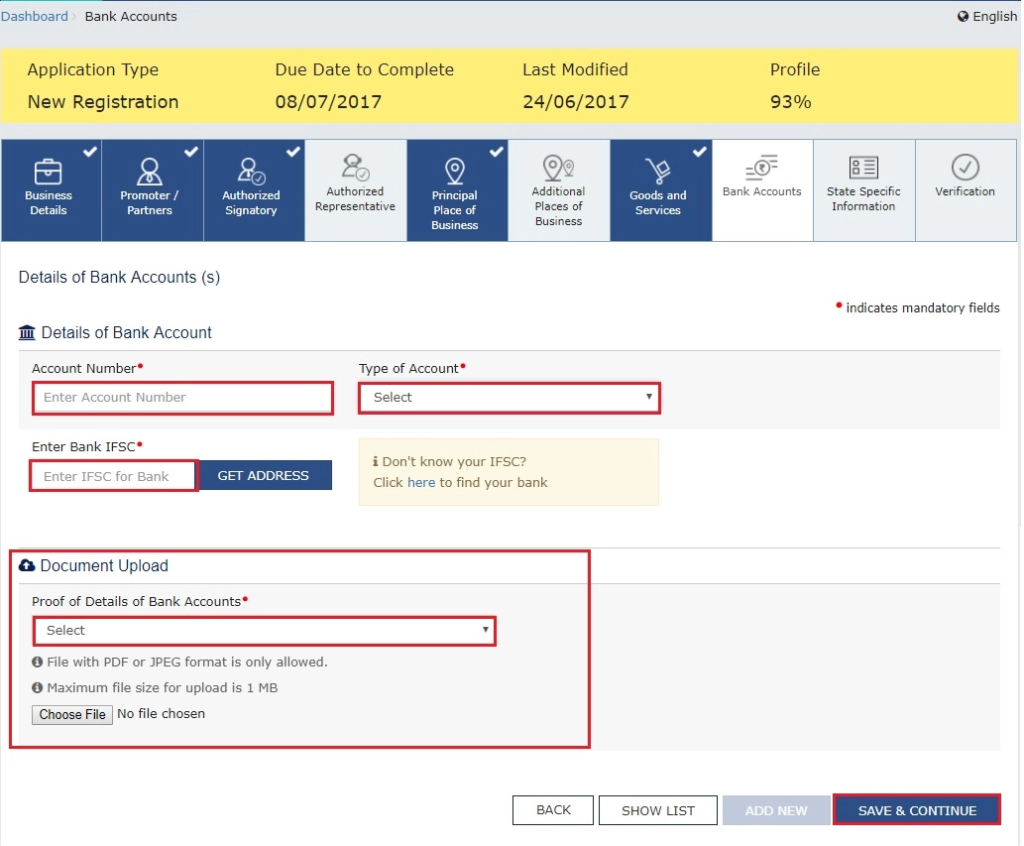
Details of Bank Account
- In this part, enter the number of bank accounts held by the applicant.
- If there are 5 accounts, enter 5. Then provide details of the bank account like account number, IFSC code and type of account.
- After completion, upload a copy of the bank statement or passbook in the place provided.
Verification of Application
In this step, verify the details submitted in the application before submission. Once verification is complete, select the verification checkbox. In the Name of Authorized Signatory drop-down list, select the name of the authorised signatory. Enter the place where the form is filled. Finally, digitally sign the application using Digital Signature Certificate (DSC)/ E-Signature or EVC. Digitally signing using DSC is mandatory in case of LLP and Companies.
ARN Generated
On signing the application, the success message is displayed. The acknowledgement shall be received in the registered e-mail address and mobile phone number. Application Reference Number (ARN) receipt is sent to the e-mail address and mobile phone number. Using the GST ARN Number, the status of the application can be tracked
