

All HTML documents are divided into two main parts: the head and the body. When you begin any new page, it must have a declaration: <!DOCTYPE html>. It’s telling or declaring to the browser that the following file is an HTML file. To build any webpage you will need four primary tags: <html>, <head>, <title> and <body>. These are all container tags and must appear as pairs with a beginning and an ending
. 
Every HTML document begins and ends with the <html> tag. This tells the browser that the following document is an html file. Remember, tags tell the browsers how to display information. The <html> tag represents the root of an HTML document. The <html> tag is the container for all other HTML elements (except for the <! DOCTYPE> tag). Note: You should always include the lang attribute inside the <html> tag, to declare the language of the Web page.

The <head> element is a container for metadata (data about data) and is placed between the <html> tag and the <body> tag. HTML metadata is data about the HTML document. Metadata is not displayed. Metadata typically define the document title, character set, styles, scripts, and other meta information. The <head> tag contains the title of the document along with general information about the file, like the author, copyright, keywords and/or a description of what appears on the page.

Appears within the <head> tags and gives the title of the page. Try to make your titles descriptive, but not more than 20 words in length. The title appears at the very top of the browser page on the title tab. Defines the document’s title that is shown in a browser’s title bar or a page’s tab. It only contains text; tags within the element are ignored. … Text that is not inter-element whitespace

The main content of your page is placed within the body tags: your text, images, links, tables and so on.The <body> tag defines the document’s body. The <body> element contains all the contents of an HTML document, such as headings, paragraphs, images, hyperlinks, tables, lists, etc. 
Part of the web page structure is called nesting. Notice above how the tag <title> is nested inside the <head> tag, while <head> and <body> are nested inside <html>.

Now open the file it will show on the page in the web browser.
Every time you want to begin a new paragraph, you use the paragraph tag. This is a container one, so you have to remember to have a beginning and an ending. Do you remember what an ending tag looks like? Here’s the tag with an opening and a closing:
<p>…</p>
To add a single line of space, you use the break tag:
<br>
This is an empty tag and stands alone. You can use the <br> tag to insert one or more blank lines.
To create a horizontal line on your page you use the empty tag:
<hr>
One way to create bold copy in HTML is by using the headline tag. There are six levels of headlines, ranging from <h1>…</h1> to <h6>…</h6>. Here is an example of the code for all the headline sizes:
Step 1
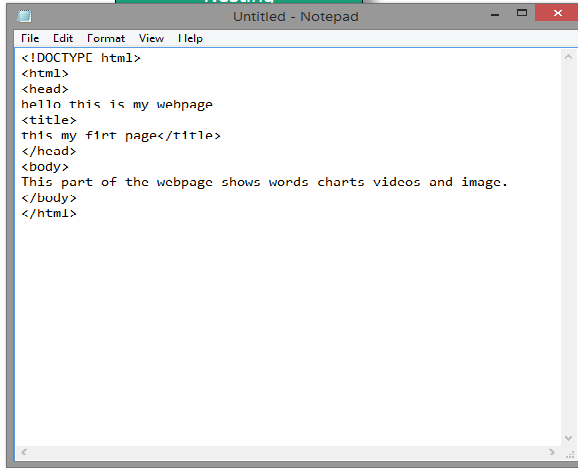
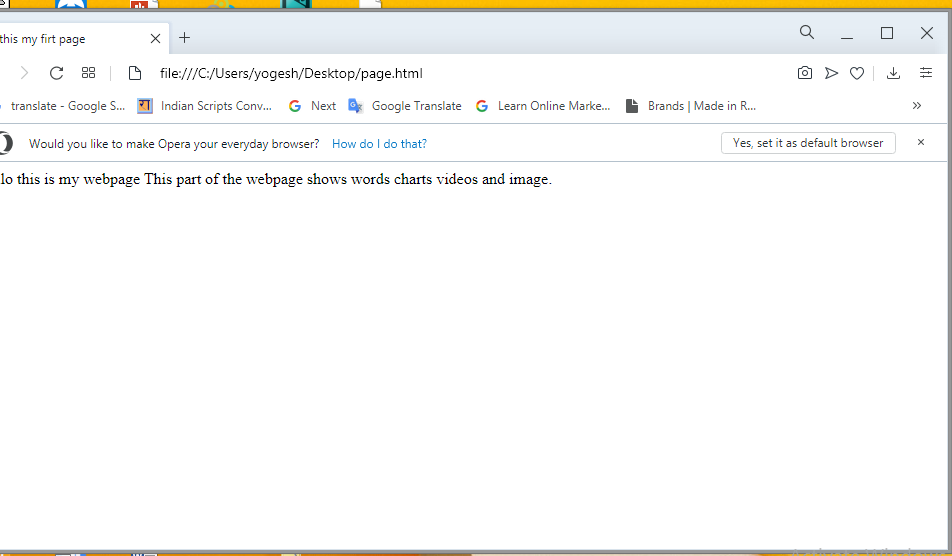
Load your text editor and enter the following.
<!DOCTYPE html>
<html>
<head>
<title>Coding</title>
</head>
<body>
<h1>coding for kids</h1>
<hr>
<p>Programming and coding skills have a
massive demand</p>
<h2> HTML programming </h2>
<p> programming language you should learn HTML. </p>
</body>
</html>
now save the file with .html extension
see the result in web browser
Element |
Meaning |
Purpose |
|
<b> |
Bold |
Highlight important information |
|
<i> |
Italic |
To denote text |
|
<strong> |
Strong |
Similarly to bold, to highlight key text |
|
<em> |
Emphasised Text |
Usually used as image captions
|
|
<mark> |
Marked Text |
Highlight the background of the text |
|
<small> |
Small Text |
To shrink the text |
|
<strike> |
Striked Out Text |
To place a horizontal line across the text |
|
<sup> |
Superscript Text |
Another typographical presentation style |
|
<u> |
Underlined Text |
Used for links or text highlights |
|
<sub> |
Subscript Tex |
Typographical stylistic choice |
|
<ins> |
Inserted Text |
Displayed with an underline to show an inserted text |
t
Lists come in a variety of forms with most either numbered or bulleted. The numbered lists are called ordered lists and the bulleted lists are unordered lists.
Lists are nested. There is a tag that identifies the type of list, like numbered or bulleted. Then within that tag there is another tag that itemizes the list. Maybe some definitions would help.

<ol>…</ol>
The ordered list is a container tag and is used for numbered lists.
<ul>…</ul>
The unordered list is a container tag and is used for bulleted lists.
<li>…</li>
The listed item tag is a container tag and is nested within the ordered or unordered tags.
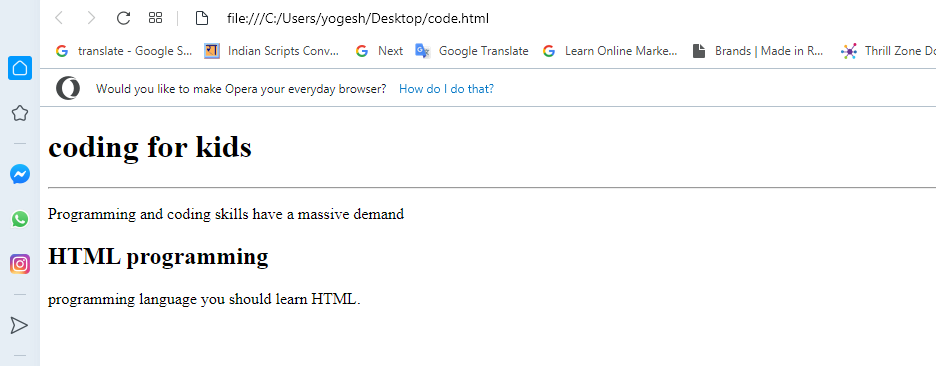
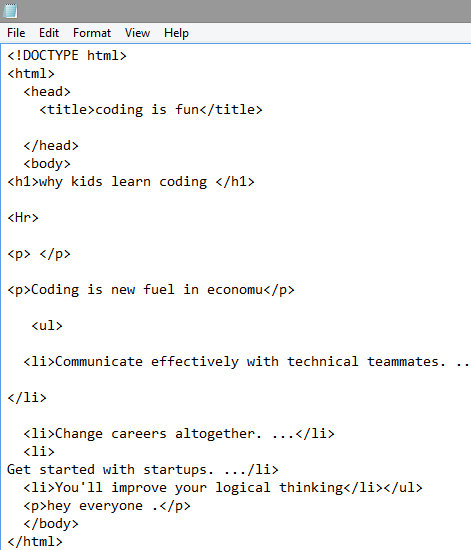
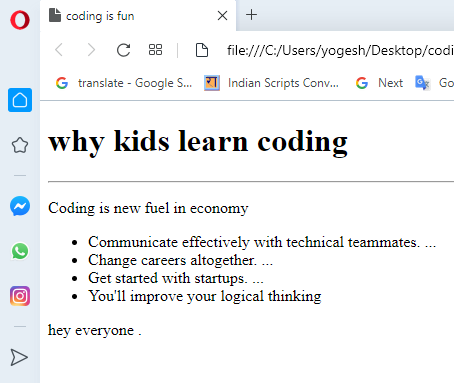
Example of bulleted list
<!DOCTYPE html>
<html>
<head>
<title>coding is fun</title>
</head>
<body>
<h1>why kids learn coding </h1>
<Hr>
<p> </p>
<p>Coding is new fuel in economy</p>
<ul>
<li>Communicate effectively with technical teammates. …
</li>
<li>Change careers altogether. …</li>
<li>
Get started with startups. …/li>
<li>You’ll improve your logical thinking</li></ul>
<p>hey everyone .</p>
</body>
</html>
save it with .html extension
see the result in web browser
EXAMPLE OF ORDERED LIST

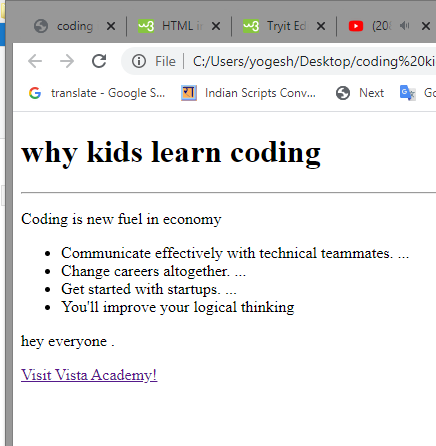
Links are the power behind the Internet. Through links, millions of pages, filled with information and knowledge, are only a click away.
Uniform Resource Locator
Every website has an address called the Uniform Resource Locator or URL 
http:// (hypertext transfer protocol) is code or what is technically called a protocol that helps one computer talk to another computer. The Internet also has another protocol called FTP (file transfer protocol).
world wide web lets the server (the computer) know the file is located on the World Wide Web.
thevistaacademy.com is domain name
Now that you understand URLs, you may find it easier to understand how to write code for links. To start let’s look at the code:
<a href=”https://www.thevistaacademy.com”>coding for kids</a>

Inside the opening tag, you will see lots of information. Up until now we’ve been working with tags that are either single words or letters. With the link tag you have the addition of what is called an attribute.
stands for hypertext reference. It refers to the URL address. It is telling the browser that there is a hypertext link coming.
is exactly what it says. You always have to enclose the address with quotation marks. (“…”) The address in this example points to the webpage for coding for kids..
that appears on your page is written between the opening tag and the closing tag. In this case Mount Rushmore. Along with words, pictures can have links. We’ll explore that soon when we cover images.
<!DOCTYPE html>
<html>
<head>
<title>coding is fun</title>
</head>
<body>
<h1>why kids learn coding </h1>
<Hr>
<p> </p>
<p>Coding is new fuel in economy</p>
<ul>
<li>Communicate effectively with technical teammates. …</li>
<li>Change careers altogether. …</li>
<li>Get started with startups. …</li>
<li>You’ll improve your logical thinking</li></ul>
<p>hey everyone .</p>
<a href=”https://www.thevistaacademy.com”>Visit Vista Academy!</a>
</body>
</html>
result in browser
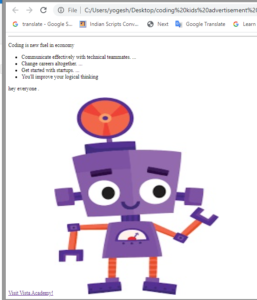
The HTML <img> tag is used to embed an image in a web page.
Images are not technically inserted into a web page; images are linked to web pages. The <img> tag creates a holding space for the referenced image.
The <img> tag is empty, it contains attributes only, and does not have a closing tag.
The <img> tag has two required attributes:
src – Specifies the path to the image
alt – Specifies an alternate text for the image
The required src attribute specifies the path (URL) to the image.
Note: When a web page loads; it is the browser, at that moment, that gets the image from a web server and inserts it into the page. Therefore, make sure that the image actually stays in the same spot in relation to the web page, otherwise your visitors will get a broken link icon. The broken link icon and the alt text are shown if the browser cannot find the image.
<!DOCTYPE html>
<html>
<head>
<title>coding is fun</title>
</head>
<body>
<h1>why kids learn coding </h1>
<Hr>
<p> </p>
<p>Coding is new fuel in economy</p>
<ul>
<li>Communicate effectively with technical teammates. …</li>
<li>Change careers altogether. …</li>
<li>Get started with startups. …</li>
<li>You’ll improve your logical thinking</li></ul>
<p>hey everyone .</p>
<a href=”https://www.thevistaacademy.com”>Visit Vista Academy!</a>
<img src=”img_rob1.jpg” alt=”rob” width=”500″ height=”600″>
</body>
</html>
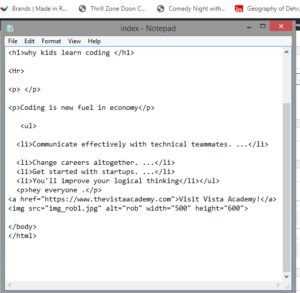
its result in shown in web browser
So far we’ve learned how to put text and images on our webpage, but let’s say we want to change the look of the text. Easy. We’ll just use some more formatting tags, such as bold, strong, italic, emphasized, small and strikeout.
<p><b>Here is bold text.</b> </p>
<p><strong>Here is strong text.</strong></p>
<p><i>Here is italic text.</i></p>
<p><em>Here is text emphasized.</em> </p>
<p><small>Here is small text.</small></p>
<p><del>Here is text with strikeout.</del></p>
As with all attributes, Style must appear in the opening tag of the element. For example:
<h1>style=”color:red”>This headline</h1>
This line of code is telling the browser to make the words”This headline” a first level headline (<h1>, the largest) and in red.
I could also use the style attribute to select a font I want, like Arial. Here’s the code:
<h1 style=”color:red”>Headline One</h1>
<h1 style=”font-family:Arial”>Headline One</h1>
But to save space, I create a style for one line by combining the color and font-family, like this:
<h1 style=”color:blue;font-family:Arial”> Headline Two</h1>
Notice the color and font-family are inside the quotes and separated by a semi-colon (;).
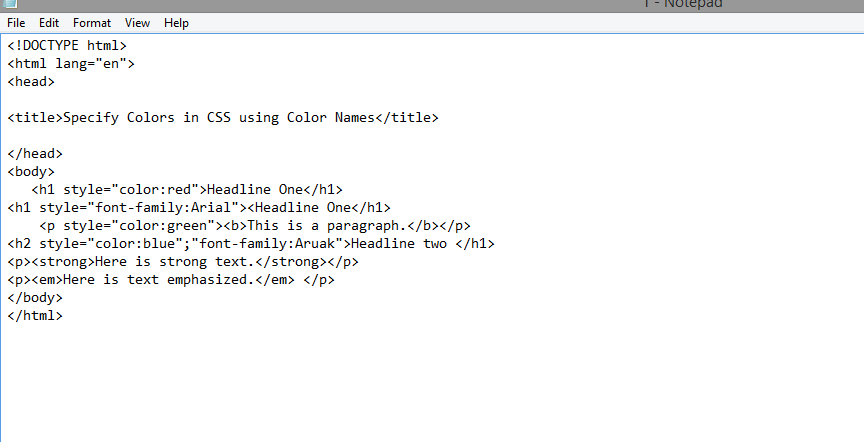
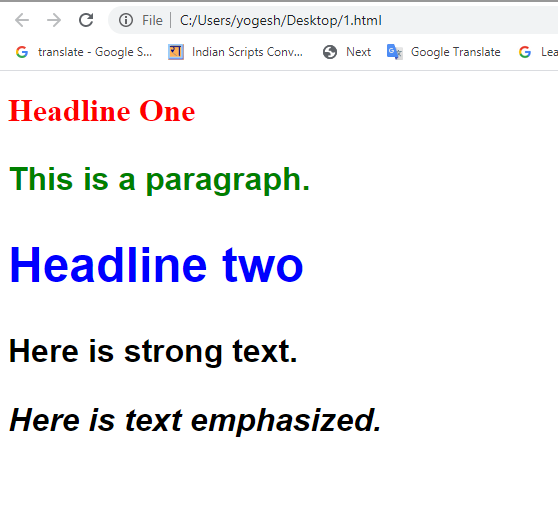
EXAMPLE
<!DOCTYPE html>
<html lang=”en”>
<head>
<title>Specify Colors in CSS using Color Names</title>
</head>
<body>
<h1 style=”color:red”>Headline One</h1>
<h1 style=”font-family:Arial”><Headline One</h1>
<p style=”color:green”><b>This is a paragraph.</b></p>
<h2 style=”color:blue”;”font-family:Aruak”>Headline two </h1>
<p><strong>Here is strong text.</strong></p>
<p><em>Here is text emphasized.</em> </p>
</body>
</html>

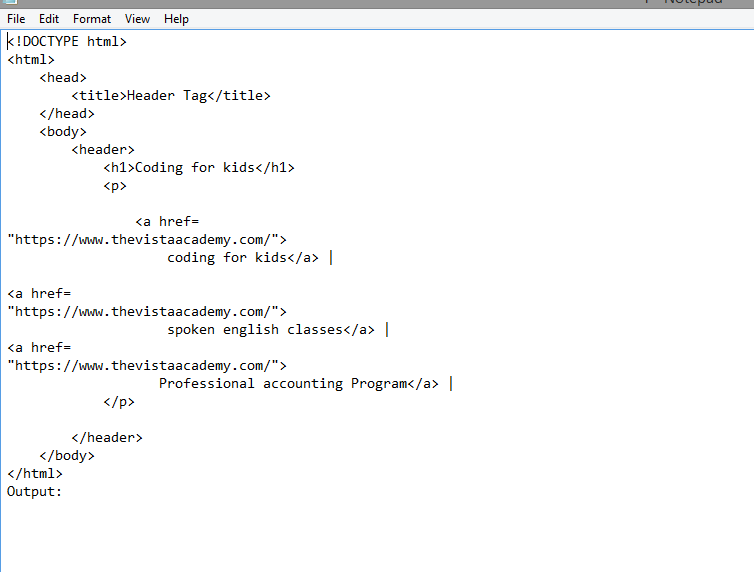
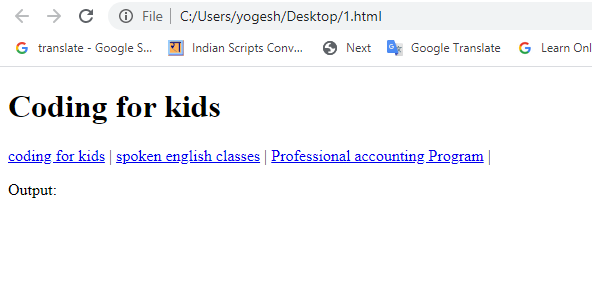
The <header> element represents a container for introductory content or a set of navigational links.
<html>
<head>
<title>Header Tag</title>
</head>
<body>
<header>
<h1>Coding for kids</h1>
<p>
<a href=
“https://www.thevistaacademy.com/”>
coding for kids</a> |
<a href=
“https://www.thevistaacademy.com/”>
spoken english classes</a> |
<a href=
“https://www.thevistaacademy.com/”>
Professional accounting Program</a> |
</p>
</header>
</body>
</html>
Output:

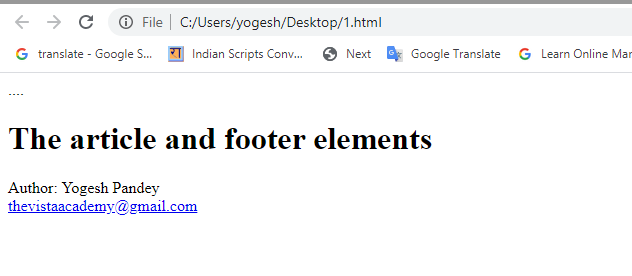
A <footer> element typically contains:
<html>
<head>.
<body>
<h1>The article and footer elements </h1>
<footer>
<p>Author: Yogesh Pandey<br>
<a href=”mailto:thevistaacademy@gmail.com”>
thevistaacademy@gmail.com</a></p>
</footer>
…</head>
</body>
</html>
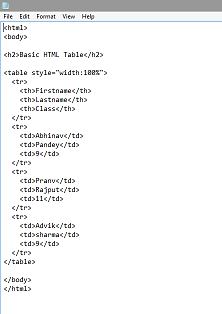
<html>
<body>
<h2>Basic HTML Table</h2>
<table style=”width:100%”>
<tr>
<th>Firstname</th>
<th>Lastname</th>
<th>Class</th>
</tr>
<tr>
<td>Abhinav</td>
<td>Pandey</td>
<td>9</td>
</tr>
<tr>
<td>Pranv</td>
<td>Rajput</td>
<td>11</td>
</tr>
<tr>
<td>Advik</td>
<td>sharma</td>
<td>9</td>
</tr>
</table>
</body>
</html>

[dashboard_notes]
This quiz is no longer available.